
STEP 1: Download and install PB Remote
- PB Remote is available as a single-user, downloaded PropertyBoss version 10.03g8.
- Request PB Remote by emailing care@propertyboss.com
STEP 2: PBQB Utility
- Navigate to the C:drive > Program Files> PropertyBoss
- Double-click to open the PBQBUtility.exe program
- Once open, right-click the program icon on your toolbar to pin to the desktop
STEP 3: Map the program
- All QuickBooks users must be logged out.
- QuickBooks must be closed completely on all user computers.
- Note your accounting file name(s) and prefix(es) listed in PropertyBoss
- General Ledger > Edit Account File > screenshot “File” tab
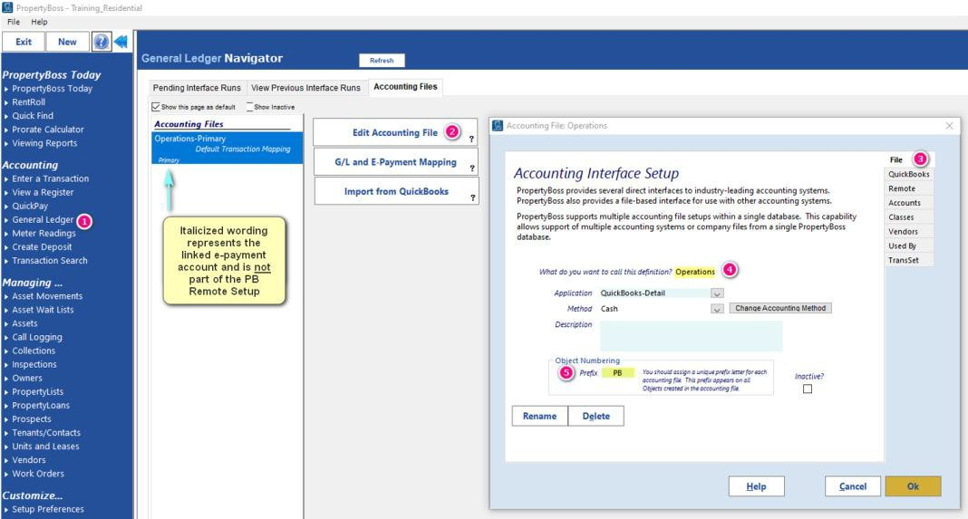
1. Under “Setup Options”, click “Define Accounting Files”
2. Type in the Accounting File Name and Prefix as they appear in PropertyBoss.
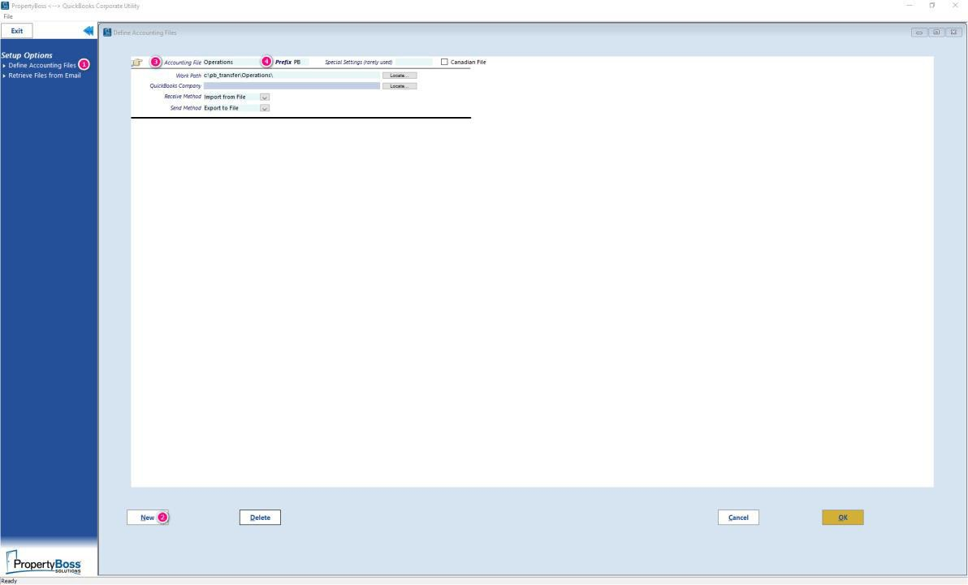
3. The “Work Path” will default to creating a pb_transfer file folder on the User’s local C: drive. It is advised that clients using a shared-drive to store their QB company files in a centralized location update the Work Path accordingly.
- IMPORTANT: QuickBooks company files (QBW files) MUST be stored on a lettered drive (Q:, R:, S:, etc.) and MUST NOT be stored on the local C: drive.
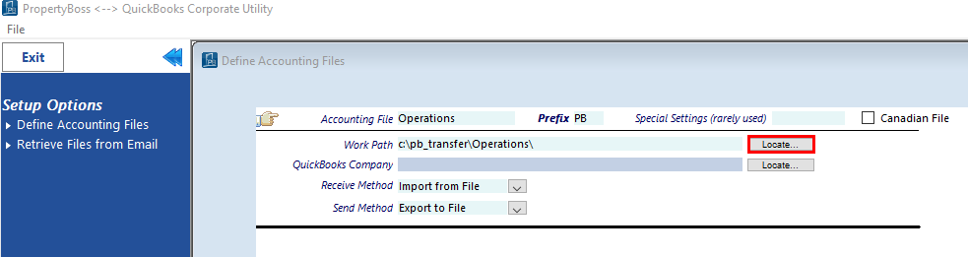
4. Using the “Locate” button, navigate to the corresponding QuickBooks Company file save location.
- These files have a “green” icon and use a ".QBW" file extension.
- If you are unsure of the save location, you may open QuickBooks > click “File” > select “Open Previous Company” > note the pathway listed on the expanded window.
- Once noted, you MUST close QuickBooks before resuming setup.
5. Received Method is “Import from File”.
6. Send Method is “Export to File”.
7. Click “OK” to save the accounting file setup.
8. Log into QB Company file as the “Admin” user
9. Place the company file in Single-User mode.
STEP 4: PB Remote
- In PB Remote, click “Export Setup for Remote” for the Accounting File. Follow the prompts.
- If PropertyBoss needs to be added as authorized Third-Party Application, the QuickBooks software icon will blink/flash.
- Select the third option “Yes-whenever this QuickBooks company file is open”
- Go to General Ledger > Accounting File > Edit Accounting File
- On the “QuickBooks” tab, confirm QB file pathway matches pathway in PB Remote.
STEP 5: PropertyBoss Interfacing
- In PropertyBoss, go to General Ledger > Accounting File > click “Import from QuickBooks” > and follow the prompts.
- Interface to QuickBooks
Additional Resource: Creating a Lettered Drive
The following general Windows instructions may help you assign a drive letter to a shared network location so PropertyBoss can access it. PropertyBoss Support does not configure mapped drives or network access for clients. The available options and exact steps may vary based on your organization’s network, security settings, and Windows configuration.
- Open File Explorer.
- Select This PC.
- Select Map network drive. Depending on your Windows version, you may need to right-click This PC or open the toolbar menu to find this option.
- Choose an available drive letter, such as P:, S:, or Z:.
- In the Folder field, enter the network path provided by your organization, such as \\ServerName\SharedFolder, or select Browse to locate it.
- If appropriate for your environment, select Reconnect at sign-in.
- Select Finish.
Important: You may need network permissions, credentials, or assistance from an administrator. For help identifying the correct network path, selecting a drive letter, resolving access issues, or confirming your organization’s requirements, contact your IT support provider.